Showing posts with label Changing Leaves. Show all posts

Monday, October 12, 2026

Leaf Art with Ink

 Hello Crafty Friends


The fall season has made a brilliant appearance in the Upper Midwest this year, 2026.   I don't recall in my lifetime seeing so many rich colors and many on one tree!

The day I filmed this was just about peak for the colors, and today its the kind of weather no one really dreams of - foggy, cooler temps, and nearly all the leaves on the ground.

Its a perfect day to craft a few of those leaves into permanent prints.

Supplies: 

A leaf - I used a real maple leaf but you could use a silk leave, or a leaf from a succulent plant.  

watercolor paper

watercolor pencils

clean water

ink 

paintbrush - (like from a kids' paint set) 

Optional: stamps for background, white gel pen, gel medium or mod podge

INSTRUCTIONS:
Using your watercolor pencil, trace around your leaf, then color in the background with the watercolor pencil. Let Dry

With your choice of ink, cover the back of the leaf, especially the veins, with ink

Press your inked leaf down on the open space pressing every corner down.  Lift.  You should have a leaf print in the space.

If you print does not show, add a bit of water to the leaf area, and again to the leaf.  

Press it down again, remembering that it will be wet.  Move the ink around by tipping the paper and set aside to dry.  

Add text to background

Add splatters with white gel ink

To seal for mailing as a post card: Apply a layer of gel medium or mod podge 

Try this technique with a variety of leaves.  I'll try a succulent plant leaf or an African Violet Leaf next.


If you make leaf prints with this technique I'd love to see them - post them over at Instagram

card.connoisseur

Watch this video at My YouTube Channel

Thanks for stopping by. Be Blessed! sb


Saturday, September 21, 2024

COLOR COMBO


Today's challenge for our Blog Hop - Stamping with Friends - 
Inspiration from Around the World is a:


Did you ever wonder what the world would look like if our leaves were not just yellow or green or fall reds and oranges?  How about pink leaves or blue leaves or pink & blue leaves. Sometimes my artful creations in paper crafting are realistic, but today my card is bringing all these colors together!

I'm the Card Connoisseurs Susan Boback.  I love ink and adding color.  This is a fairly easy project and while its not new, it has been quite popular in 2024. 
You are inking the background which is EMbossed - raised above - the leaves design. 
I used the Stampin' Write makers to color the leaves by hand in four of these colors.


If you're new to the markers of Stampin' Up!, the Stampin' Write are water-based and can also be spritzed with water, used for watercolor techniques, and will wash off tools and skin and most clothing if washed in cold water right away.  The Stampin' Blends are alcohol based and more permanent. If you want to spritz them, it'll have to be with rubbing alcohol, and they do not wash off of clothing, or skin or tools unless you use an alcohol wipe or other cleaner. 


As shown above, color the leaves in any of these colors:  Shy Shamrock green, Flirty Flamingo pink, Fresh Freesia lavendar, Blueberry Bushel blue, and then I added Crushed Curry yellow.  Since I don't use these colors together, I found this quite a challenge. But when I saw this as art -   and it didn't have to be realistic - it became fun to meet this challenge!

Choose an Embossing Folder with a deep imprint AND a lot of background space - I used Changing Leaves Hybrid Embossing Folder   (Please note that if a product says "Currently unavailable" on our Stampin' Up! website, it is back ordered - check back again) 
Emboss on White cardstock - Basic White
Turn over the cardstock so you are using the DEbossed side: that's where the leaf images are lower than the background.

Add any non-traditional color to the images, staying in the lines. Do this quickly - this is not a color by number picture that should be exactly perfect but more abstract art.  

Open a full-size ink pad - which I found works the best, as opposed to the small "spot" square pads -  and hold it in your hand face down. I used Shade Spruce green.
Press lightly at first and drag the ink pad across the print, applying slightly more pressure to the background areas. 
Try not to stop in the middle of the print - you don't want to get the lines from the end of the ink pad. 

Turn the print sideways and drag the ink pad across the print again.
Now you've added ink to the background which makes the leaves colors pop out.


Trim your print and mount it on a bright background. I used Blueberry Bushel, one of the five colors and also one of my favorite blues.   


Add a sentiment like "Wishing you the brightest birthday" from Cheerful Daisies stamps, or leave without and use for just about any occasion.   Make a double bow of silver trim to attach under the tag.

To discover more about these colors and products, shop our Fall Mini Catalog, link at the top of the page. You can join my team and get a 20% discount each time you order, visit here www.cardconnoisseursb.stampinup.net  Thanks for stopping by! sb

Now hop over to the next blog and see more creativity using these five colors! 


Thursday, July 25, 2024

CHANGING SEASONS with LEAVES

 While many might automatically think of Fall or Autumn, since these new products were released in July, my mind automatically went to all four seasons which we have here in the Northern Hemisphere. 

Spring is a long-awaited season.  It is the season when leaves appear on our naked cold wintering trees, and these leaves are the hope we long for that winter is over.   The leaves of Spring are often a light, but brilliant green not found in other seasons.  Its as if God has saved this color just to get our attention and celebrate.

The leaves of summer are full bodied green.  The leaves are far more than foliage on our trees, they are protection and safe havens for our birds and small critters, and are the sign that our trees are alive.

The leaves of  in the Fall or Autumn in the Northern Hemisphere change colors, depending on the amount of light from the previous season.   And while the Fall signals another big change is coming, you can't help but enjoy this change from green to a variety of colors.


When Winter comes along in November or later and often lasts through April, the leaves have fallen away, so there are no leaves on the trees then. I imagine if any were to remain they would be frozen, covered in snow or frosty.

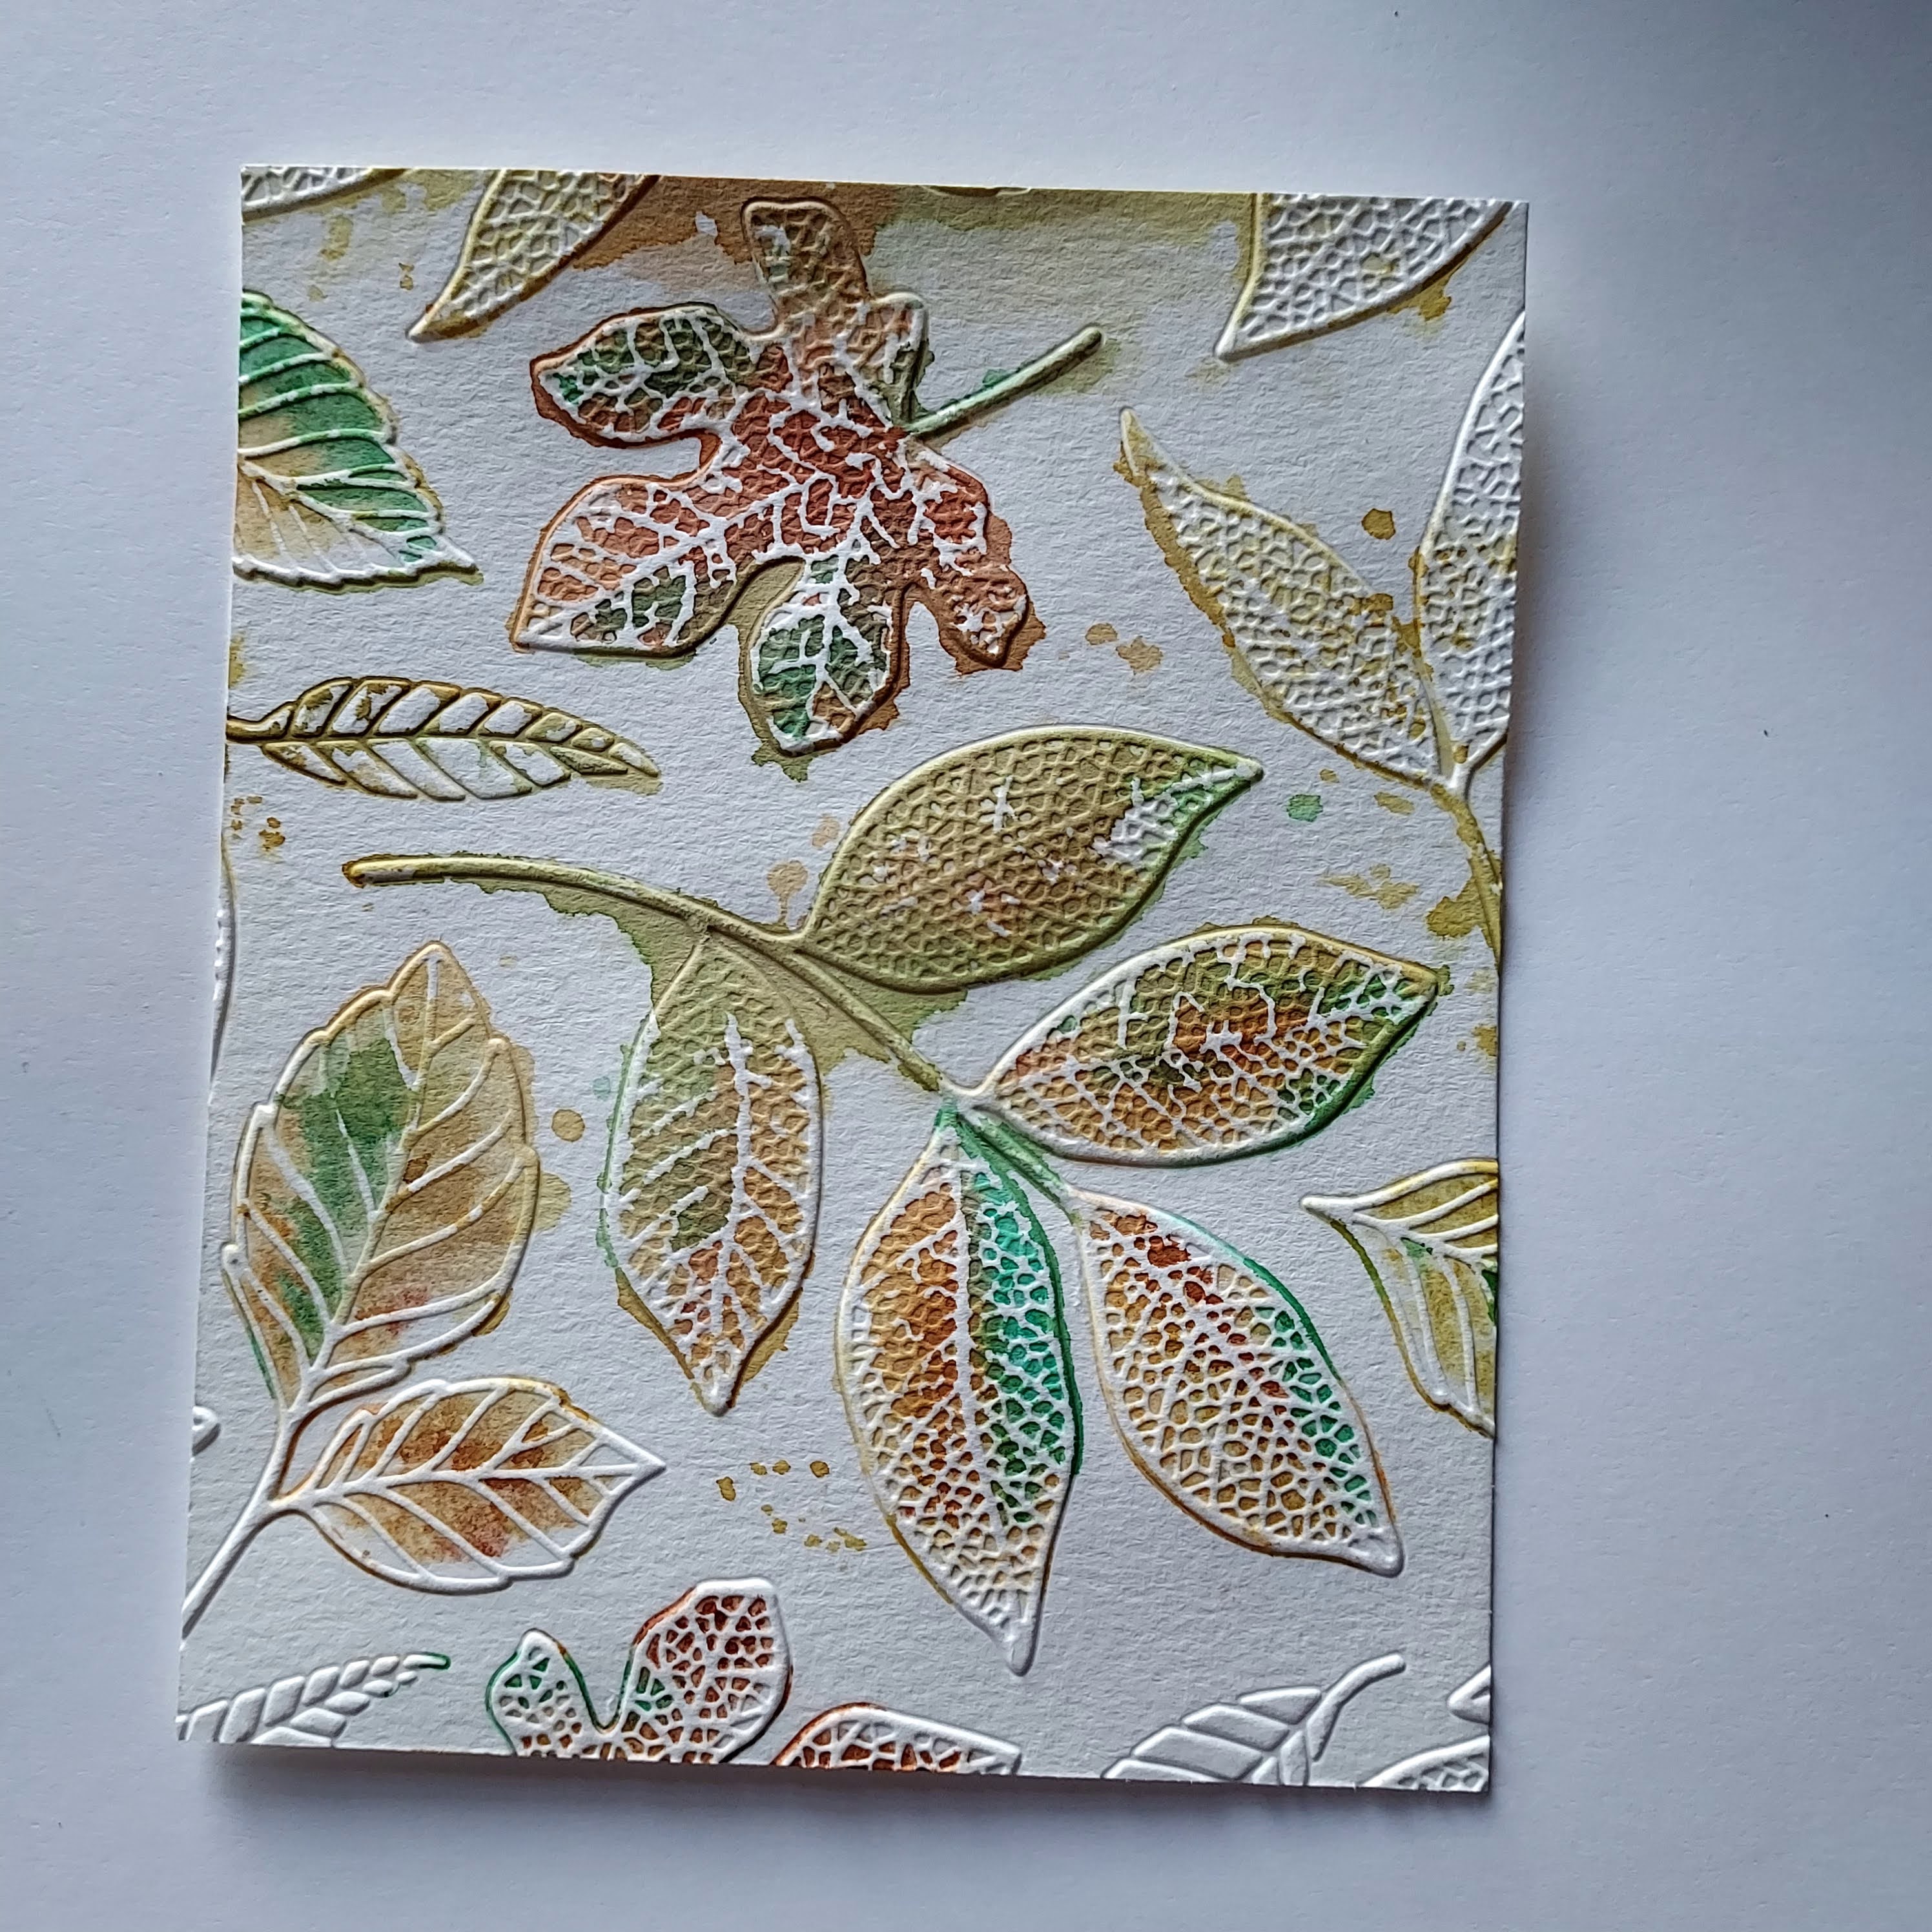
TECHNIQUE #1 - REVERSE EMBOSSING WITH INK ON WATER COLOR PAPER

The products I used are: Water Color Paper 4x6, Embossing Machine, Embossing folder, clean water, ink for leaf color, another ink for background color, water painter or paint brush. Note that the ink doesn't have to be the realistic leaf color  (Old Olive or Granny Apple Green for the leaves. Blueberry Bushel for the background)

On a 6x6 or 4x6 piece of water Color Paper, emboss the leaves with the Embossing folder, but don't include the die.   On the DEbossed side of the leaves - that's the imprint that is lower or down in from the background of the design - drop a few drops of clean water, then with a water painter or small brush paint brush, add a small amount of ink from your ink pad or from the re-inker bottle that you have created a puddle of ink with.   When you add the ink to the drops of water, it will flow as you move it slowly around the leaf, making sure to stay within the embossed leaf shape.

Dry with a heat tool. 

With background color ink pad.  Open the ink pad and drag it across the debossed side of the print. You may know this as Reverse Embossing.  Start at the top or one end, and drag in one stroke, the pad over the entired piece.  Don't press too hard because you don't want too much background ink on the leaves. Its OK though if that happens - its art.  Move the ink pad to the next section of the print and drag it in only one direction again, and repeat until the whole print background is covered with the ink.  Refrain from going back and filling in spaces, as you don't want the straight line edge of the pad to make marks. You'll discover how you want your prints to look.   

Dry with a heat tool.   Use as is or cut out some leaves and mount on a coordinating cardstock as I have done on the print above.

TECHNIQUE #2 - DRY EMBOSS WITH WATER COLOR PAPER (This print is my favorite) I have always loved blues and greens together

Water color paper 4x6, Grass Green Ink, Blueberry Bushel Ink for Background, Water Painter Brush or Paint Brush, clean water

With this technique you are doing the opposites of #1. The colors I chose for this remind me of the leaves of summer and the brilliant blue sky.  On the EMbossed leaves - that's the raised above side: Use a damp (not wet) paint brush, add ink from the stamp pad or a puddle of re-inker ink, and paint it around within the leaf, making sure to stay in the leaf. 

Dry with a heat tool.  You want to make sure these images are dry before painting the background so the colors don't bleed together.  But if they do - its art.  With a clean damp brush, add ink from the pad or puddle on the background spaces, bringing it UP TO the edge of the leave. 

TECHNIQUE #3  ADD INK TO THE EMBOSSING FOLDER FROM THE INK PAD

Embossing Folder, Embossing Machine, Water Color Paper, 3 or more colors of ink pads.

                                            Real Red, Wild Wheat, Grass Green, Pecan Pie Inks

With Ink pad, blending brush or sponge dauber, add inks randomly to both sides of the Embossing Folder, inking both the leaves and the background, and leaving some spaces without ink. Spritz both sides with water. NOTE that the back side of the E. Folder (that doesn't have the square SU image on it) is the DE bossed side, and the ink will go down into the leaf.  The EMbossed side, which is the top or the front of the E. Folder, the ink will go onto the background.  Put a 6x6 or 4x6 piece of water color paper in and machine and emboss.  You will get two different prints, one on each side of the paper. Now before the ink dries or before you clean it off,  spritz again and put another piece in and emboss again to get yet another print. 

TECHNIQUE #4 REVERSE EMBOSSING ON THE EMBOSSING FOLDER

Embossing Folder, Embossing Machine, Water Color Paper, Ink Pad


This view shows the DEbossed side.  I think you can see that the ink is below the background.

This view is the opposite with the ink on the EMbossed, where the leaf and ink is raised above the background.

This is similar to the Reverse Embossing, except that you are covering the Embossing Folder with the ink and not the paper.  Drag the ink pad across the front and back of the E Folder, completely covering the folder. Put the dry Water Color paper in. Emboss.  Check which side you like. You may decide to spritz the E. Folder to get the remaining ink off the folder - no ink is wasted.

TECHNIQUE #5  EMBOSSING WET CARDSTOCK

                                                            Here is the DEbossed side.


Here is the EMbossed side, after spritzing with water which produces a deeper impression.

TECHNIQUE #6 STAMP THE IMAGE  ON VELLUM WITH VERSAMARK/CLEAR EMBOSSING POWDER


I didn't plan this out first, so there were a few extra steps.  I heat embossed with clear embossing powder on vellum, thinking I would die cut them and be done.  But the leaves didn't show up like shown on the left image on vellum below.  So I put that pieced of heat embossed vellum into the embossing folder, and dry embossed it for texture, shown below on the right.  I didn't expect the image texture to be so detailed. 

Here's what I did then to create a card with a "wintery" leaf in mind.  

I heat embossed by stamping with Versa Mark, water mark ink with Clear Embossing powder on Night of Navy Cardstock   On Vellum, I stamped with Versa Mark and Clear Embossing powder, heat embossed.   I cut them out. 

Then I put the leaves, individually, in the Embossing Folder and embossed.  This brings out the details, and changes from see-through to opaque.  On the Debossed side, I outlined the leaves with the Slate Grey Blends marker.  

I glued the large leaf by the spines and stem and with very little glue, glued the stem of the small leaf.  

I'm so pleased with the texture and look of this technique which could be used for any season or reason.  Do you think you would try any of these "Changing Leaves" techniques? 

Saturday, July 20, 2024

CHANGING LEAVES - Stamping with Friends Blog Hop


CHANGING LEAVES


When my 9 year old granddaughter Natalie, came to visit with her family this week, she shyly told her mom, "I'm hungry for crafting."  That my friends, is music to this crafty grandmother's ears and heart!

We did some ink transferring which you see in the photo above.  I love to make water color prints with our Stampin' Up! inks and paper, so here's what I made.   Read to see Natalie's print that inspired me.


The basis for these prints is a Gel Plate - Amazon or any craft outlet store. 


If you've never used a Gel Plate, you should know that it is sticky, which is necessary.  I used fall colors of inks: Crushed Curry (yellow), Blueberry Bushel, Peach Pie (light orange), Old Olive (green), Real Red.   I lightly tapped, once or twice, at random angles, each of the ink pads in corners and the middle of the Gel Plate, sometimes overlapping the colors.  


I used the Changing Leaves stamps but here's how I made them into one stamp.   I left them on the clear firm cellophane, like our product Window Sheet, just the way they are packaged.  If you've already removed your Changing Leaves stamps, I suggest to mount them on a large block or a Window Sheet.  In my case, I just removed all the sentiment stamps and it was all set.

Next, carefully place your stamp on top of the inked Gel Plate.  To get an even print, you can place a piece of paper over it and roll your brayer up and down, and across.  


Now carefully lift off the stamps, making sure that to slide or smudge it. (If you do its ok, its art).  Set the stamp aside face up because you're going to use it for another print. 

Now place your Basic White paper on top of the image. Smooth with your hands, over every inch or use a brayer.   


Then carefully peel back from one corner and see your print.  Set that aside.

Place a new piece of paper on top of the inked stamp to transfer the remaining ink from stamp.


AND, place another piece of paper on the Gel Plate to transfer any remaining ink from it.

To review, when you ink the Gel Plate, and stamp an image onto it, the stamped images from the first print will be the color of the paper - in this case, white. The second print is the reverse as you are putting the paper directly on the inked stamp.  The third print is the remaining ink and stamped image left on the Gel Plate which is often very light but makes a perfect background.  The ideas are endless.  

There are alot of other techniques you can do with a Gel Plate.  You can transfer black and white photos from magazines, or your own from a black ink printer. You can make your own designs of paper with acrylic paints, but my colors of choice Stampin' Up! Inks, Basic White and Water Color Paper.

What would a Gel Plate print of Changing Leaves look like in a non-traditional color?  Or maybe through the eyes of a 9- year old artist?  See for yourself - here is the print that inspired my Blog Hop post today!  Thanks, Natalie!


Thanks for stopping by to see my fun with ink and  "Changing Leaves"  techniques.  Be Blessed! sb

Don't forget about Bonus Days in July (2024). With any order of $50 you will earn a $5 coupon to use in August.   To make cards like this you would choose a base color cardstock (24 sheets for $11.50 = 48 cards), Changing Leaves Bundle - stamps & Embossing Folder ($54), inks, and glue.  If you don't have a demonstrator, I'd love to tell you more about our coordinating products and how you can join to save 20% on your orders.  

Now click on the next link below to view the inspiration by crafters from around the world!