Showing posts with label birds. Show all posts

Friday, March 1, 2024

I LOVE BIRDS - Box, Card and Treat Holder

I love birds!  I have since I was a kid.   With the release of the Flight and Airy papers for Stampin' Up! Sale A Bration (Jan - Feb 2024), the bird designs and images are so fun and springy. 

Here are my projects for Leap Day Fun Day, an in-person event I held just for fun - with birds!

CARD SKETCH 2-24 - SUSAN BOBACK, CARD CONNOISSEUR 

www.cardconnoisseursb.stampinup.net to check out the products I used today.

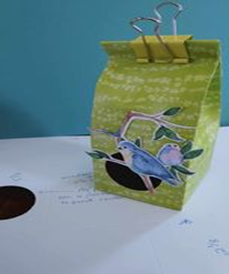
MILK CARTON BIRD HOUSE BOX, BIRDHOUSE CARD AND  BIRD TREAT HOLDER


Inspired by stampin-n-stuff.blogspot.com. This is the same design as a candy box, and can be made as small as a 1x1 cube or this 3x3. This pattern also works well with Cardstock, perfect for candy, cookies or a small gift.

Supplies: 1 – 8 ½ x 11 Designer Series Paper or cardstock, Tear & Tape, Glue, Circle Punch or Die, Window Sheet, Binder clip,  Die Cut Birds

On 11” side: score every 2 5/8” to 10 ½” (2 5/8, 5 ¼, 7 7/7, 10 ½”) You’ll have 4 sections that are 2 5/8 and the last section will be ½”. The 4 sections form the cube, the structure of the milk carton/bird house.  The ½” is the tab to connect them into the cube shape.  (If you made the candy box, this part is the same).

On the 8 ½” side:  score at 2 1/8”, 5”, then 8”. The first section at 2 ½” creates the tabs for the bottom of the milk carton birdhouse. The last ½” creates what becomes the “roof” or the top of the milk carton bird house.

Punch or Die cut the bird hole: in the first section, opposite end of the ½” tab.  Cut a piece of window sheet that is 2 ½” x 3.  Attach on inside, top & bottom with Tear & Tape.

Fold on all score lines.

On the 11” side, at what is the bottom, where the 2 1/8” x 2 5/8” section is: cut on each 2 5/8” score line across, then cut an angle piece on each side of these pieces so it will fold together better.  On the last section, ½”, cut and remove the piece that is 2 1/8 x ½”.   


Fold all remaining score lines, so that you create a box.  Add Tear & Tape to the ½” flap, then attach it to the other end which makes a cube. 

Fold up the four bottom tabs – 2 1/8” x 2 5/8 – one on top of the other, adding a small dab of glue to secure them to each other. This will complete the structure of your milk carton birdhouse.  The top will remain open for you add some Easter eggs or in this case, I added a mini size Nivea hand cream because not everyone can enjoy sugary treats.   Use a binder clip on top. (Amazon - check out my list)


Make a Bird Treat Holder or attach it to the front of a card and draw legs.                                                  


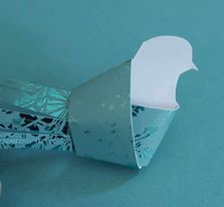
Make a bird to add to a card or to hold a wrapped candy treat.   Take a ½” to 1” x strip of paper. Fold it over and tie in a knot. Cut a tail on one end and beak and head on the other. Attach it to the front of a card, draw legs, or slide a small wrapped candy in the body.  


To tuck a wrapped candy in the bird, add one or two glue dots to the inside of the knot, but in front of the white bird body as shown here.  

I love cardinals.   I found the "Red Bird" mints, and with two glue dots attached it under the knot of the red bird.   


BIRD HOUSE CARD inspired by Jacquie Williams, Demonstrator, NZ


Using the same size of cardstock for a standard A2 card base,  (4 1/4" x 5 1/2") make this cute shape, perfect for a birdhouse, dog house, or a house warming card, in any color. 

Card Base:  5 ½ x 4 ¼” Find the center of the front, 2 1/8”, top edge, make a mark. Find the center of the 5 ½” sides at 2 ¾” and make a mark.  To make the peak, open the card and lay it flat. 

Cut from the center top on an angle to the half mark on the outside edge AND to the half mark on the fold edge. 

NOTE:  if you want the roof design on both pieces, front and back, don’t cut it at the same time, but make the half-way points on the back piece as well, then cut it after the front piece is cut. 

Before you glue on any images, use an embossing folder to add texture.  A woodgrain design would be perfect.  I used the Forever Fern embossing folder. 

Cut a vine shape for the roof edge.  Stamp inside if desired. Add a hand cut bird from Flight & Airy papers, a stamped image or use a punch art bird; flowers: die cuts or punch art. 

If you'd like to take a 20% discount with each purchase, and be part of our amazing crafting community, check out the JOIN offer at www.cardconnoisseursb.stampinup.net 

You'll also find all the products I used in today's projects, samples of cards and paper crafting projects, the Clearance Page, all inclusive kits and products sold online only.  

Thanks for stopping by!   Try these Bird projects and visit my Face Book page at Card Connoisseur Susan Boback and follow instagram card.connoisseur.

Be Blessed!sb

Friday, January 28, 2022

TECHNIQUE CLASS - Heat Emboss in any Color!


 Yes, you read that right.  How is that possible? Read on to find out. 

Emma Parkin-Wilson, Independent Demonstrator  from Australia, is my inspiration.  

You'll never buy colored embossing powder again!

Why Emboss?

*To highlight a stamped image

* To add texture

* To seal the edges of your image from ink in the background, or

* To seal the edges of your image to ink within the embossed lines

If you’ve never heat embossed before, here are the basic tools and instructions. (If you’ve done it, scroll down to the instructions for today’s project in RED.)

Heat Tool – NOT a hair dryer

Anti-static pad  - find it here at Amazon

VersaMark watermark Ink

Embossing Powder Clear

Heart & Home Stamps

Stamp Image - Hello Friend is a Sale A Bration Free choice - the following photos show the images, embossed with clear embossing powder. You can see how shiny the image is.

Basic instructions:

1. Rub an anti-static pad across your cardstock. If you don’t do this, the embossing powder will cling to areas where you don’t want it to go.

2. Ink up your stamp, making sure the VersaMark is on all of the stamp, but not on the edges beyond the image.

3. Press the stamp firmly (don’t rock it) on your cardstock to make an imprint. Remember that VersaMark is clear, so that you won’t see the stamped image as well as if it was stamped with a color. 

4.  Using a tray or clean paper underneath your cardstock, sprinkle the stamped image with the embossing powder; then tap the powder off into the tray or paper, and pour it back into its container. With a fine brush, remove extra powder not on the image.

 5) With heat tool, melt the powder. This is embossing!

Hold the cardstock/image near the tool and watch it closely as it does get hot.  Take all precautions not to burn yourself or your work space. You may choose to use a tweezer or to put your piece in a box to emboss it. 


Now that you’ve embossed, decide if the image will remain as is, or if you will shade the background or color within the image. 

Today’s Project: Heat Emboss in your favorite color!

You’re going to use the same FIVE (5) steps for basic embossing, except for one additional step:

Following Step 2 above, “ink up the stamp with VersaMark”, then ink the stamp in your choice of color, before you stamp on the paper. (Don’t panic about putting your stamp from VersaMark ink right into another ink pad, because VersaMark is clear. That’s how to remember not to put the color on first, because you wouldn’t want to ink up the stamp in the color first and then put it onto the VersaMark pad.)

Then follow the steps, making sure to use the anti-static pad first, stamp your image on your cardstock, cover it with CLEAR embossing powder, shake off the excess, and emboss it with heat tool. 

Here are the two birds, embossed with a color ink.  


Learning this technique enables you to highlight any image, whether on a white or light background or a dark background for a tone-on-tone design. 

TONE ON TONE DESIGN

By using the technique described above, you can create a beautiful tone-on-tone or monochromatic design by heat embossing in your favorite color ink on the same color cardstock, then coloring the stamped image with white pigment ink or by using chalk or a chalk marker. 

Although embossing with just the VersaMark on the dark paper produces a good image, to create this monochromatic design, with the addition of the coordinating ink AND the VersaMark with the clear embossing powder, you create a darker, more visible image.

Here are the two bird images. Then they are colored in with white pigment ink or chalk marker. You may want to try coloring them in with the chalks or the white water color pencils.  Try it and let me know how it looks!


The cardstock and ink are Night of Navy. I used white pigment ink and the chalk marker. Although the breast of the bird looks like light blue, it is only a lighter amount of the white ink. This really is my favorite print.  This bird is from a retired set.  I just love it!


The "Hello Friend" bird and branch (Sale A Bration Jan/Feb 2022) is stamped on Pale Papaya cardstock with Pale Papaya ink (In-Colors 2021-2023). The layer is Evening Evergreen, and the card base is Pumpkin. The ribbon is Window Pane ribbon in Evening Evergreen.  The white is White pigment ink and Chalk Marker.

Here is another image using this technique.

You can find any of the products used at the links above in the embossing instructions, or at my online store Here.  

Check out my PROJECTS tab on my page Here.

Follow my posts on Face Book at Card Connoisseur. Contact me with any questions. Post your projects there, too!

As always, thank you for stopping by.   I look forward to seeing what you create.   Be Blessed!  sb