I love birds! I have since I was a kid. With the release of the Flight and Airy papers for Stampin' Up! Sale A Bration (Jan - Feb 2024), the bird designs and images are so fun and springy.
Here are my projects for Leap Day Fun Day, an in-person event I held just for fun - with birds!
CARD SKETCH 2-24 - SUSAN BOBACK, CARD CONNOISSEUR
www.cardconnoisseursb.stampinup.net to check out the products I used today.
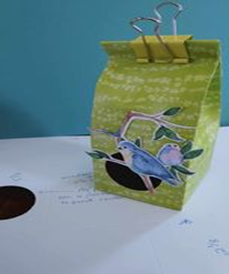
MILK CARTON BIRD HOUSE BOX, BIRDHOUSE CARD AND BIRD TREAT HOLDER

Inspired by stampin-n-stuff.blogspot.com. This
is the same design as a candy box, and can be made as small as a 1x1 cube or
this 3x3. This pattern also works well with Cardstock, perfect for candy,
cookies or a small gift.
Supplies: 1 – 8 ½ x 11 Designer Series Paper or cardstock,
Tear & Tape, Glue, Circle Punch or Die, Window Sheet, Binder clip, Die Cut Birds
On 11” side: score every 2 5/8” to 10 ½” (2 5/8, 5 ¼,
7 7/7, 10 ½”) You’ll have 4 sections that are 2 5/8 and the last section will
be ½”. The 4 sections form the cube, the structure of the milk carton/bird
house. The ½” is the tab to connect them
into the cube shape. (If you made the
candy box, this part is the same).
On the 8 ½” side: score at 2 1/8”, 5”, then 8”. The first section at 2 ½” creates the tabs for the bottom of the milk carton birdhouse. The last ½” creates what becomes the “roof” or the top of the milk carton bird house.
Punch or Die cut the bird hole: in the first section,
opposite end of the ½” tab. Cut a piece
of window sheet that is 2 ½” x 3. Attach
on inside, top & bottom with Tear & Tape.
Fold on all score lines.
On the 11” side, at what is the bottom, where the 2 1/8” x 2
5/8” section is: cut on each 2 5/8” score line across, then cut an angle
piece on each side of these pieces so it will fold together better. On the last section, ½”, cut and remove the
piece that is 2 1/8 x ½”.

Fold all remaining score lines, so that you create a
box. Add Tear & Tape to the ½” flap,
then attach it to the other end which makes a cube.
Fold up the four bottom tabs – 2 1/8” x 2 5/8 – one
on top of the other, adding a small dab of glue to secure them to each other.
This will complete the structure of your milk carton birdhouse. The top will remain open for you add some Easter eggs or in this case, I added a mini size Nivea hand cream because not everyone can enjoy sugary treats. Use a
binder clip on top. (Amazon - check out my list)

Make a Bird Treat Holder or attach it to the front of a card and draw legs.

Make a bird to add to a card or to hold a wrapped candy treat. Take a ½” to 1” x strip of paper. Fold it over and tie in a knot. Cut a tail on one end and beak and head on the other. Attach it to the front of a card, draw legs, or slide a small wrapped candy in the body.

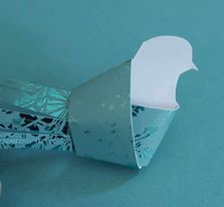
To tuck a wrapped candy in the bird, add one or two glue dots to the inside of the knot, but in front of the white bird body as shown here.
I love cardinals. I found the "Red Bird" mints, and with two glue dots attached it under the knot of the red bird.

BIRD HOUSE CARD inspired by Jacquie Williams, Demonstrator, NZ

Using the same size of cardstock for a standard A2 card
base, (4 1/4" x 5 1/2") make this cute shape, perfect for a birdhouse, dog house, or a house
warming card, in any color.
Card Base: 5 ½ x 4 ¼” Find the center of the front, 2 1/8”, top edge, make a mark. Find the center of the 5 ½” sides at 2 ¾” and make a mark. To make the peak, open the card and lay it flat.
Cut from the center top on an angle to the half mark on the outside edge AND to the half mark on the fold edge.
NOTE: if you want the roof design on both pieces, front and back, don’t cut it at the same time, but make the half-way points on the back piece as well, then cut it after the front piece is cut.
Before you glue on any images, use an embossing folder to add texture. A woodgrain design would be perfect. I used the Forever Fern embossing folder.
Cut a vine shape for the roof edge. Stamp inside if
desired. Add a hand cut bird from Flight & Airy papers, a stamped image or use a punch art bird; flowers: die cuts
or punch art.
If you'd like to take a 20% discount with each purchase, and be part of our amazing crafting community, check out the JOIN offer at www.cardconnoisseursb.stampinup.net
You'll also find all the products I used in today's projects, samples of cards and paper crafting projects, the Clearance Page, all inclusive kits and products sold online only.
Thanks for stopping by! Try these Bird projects and visit my Face Book page at Card Connoisseur Susan Boback and follow instagram card.connoisseur.
Be Blessed!sb

No comments:
Post a Comment