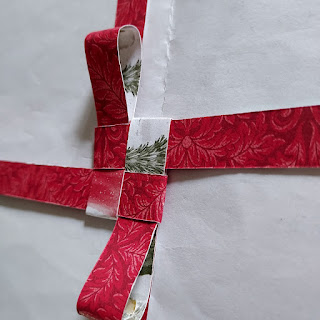
Hello friends:
Lets make a paper ornament that doesn't take any glue or adhesive! And our Designer Series Papers that are beautifully coordinated on both sides are perfect for this project. Today's focus for Stamping With Friends Blog Hop is Blogger's Choice.
I'm in love with paper, have been all my life. A friend that is a weaver shows us how folding double-sided papers, and with no gluing, a beautiful paper ornament can be made. This ornament did take some practice, but once you "get it" you will make a few.
There's a few tricks or hints that are important:
Make sure your measurements are exact.
Don't make something simple complicated.
Here is my video demonstration link that shows how to make the 2 diamond shaped paper beads. The photos below show making the Swedish flower center.
MAKE THE DIAMOND SHAPED BEAD:
Cut a strip of paper 9 1/2” long by 7/8”
wide
Score on the long side, 7/8” across until you have 9 sections that each measure exactly 7/8”, then an end tab that is NOT 7/8”. Make the end tab into a point.
For your practice pattern, label each 7/8” section consecutively, 1, 2, 3 and so on up through 9. In practice, you may wish to number both sides of the paper, until you get the concept of folding the sides of the diamond together
FOLD each 7/8” section on the score lines, then open it to lay flat
Hold the left end in your left hand and the right end in your right hand
Take the left end and while you’re pulling it over to the right, twist it up so that the fold line between #3 and #4 square meets the edge of the #6 square. Wrap it under #6 which bringing the left end up, then tuck the #1 square (end square) under the #4 square – this creates a diamond shape, then continue to turn and twist the diamond, while wrapping the right side squares around the entire shape in this order: the #7 covers the #2, the #8 covers #5, #9 covers #4
Then the remaining end tab gets tucked under #7, and make sure to pull it taught, and trim off the excess.
Your Diamond shaped paper bead is complete! Make the second bead out of the same print or the reverse side of the paper.
MAKE THE FLOWER CENTER:
Cut four pieces that are ½” x 7 ½” – if you use all the same double sided, use 2 of one side print and 2 of the other side print. You may wish to use an older paper, that you can keep for a sample.
Fold each one exactly in half, then lay them out - one with the fold down and one with the fold up.
For the Over and Under for this design:
OVER means over the top and the bottom (see this on the video at 14:22 minutes/seconds into the video)
UNDER means under the top but through the piece (see this on the video at 14:37 minutes/seconds into the video)
Weaving the strips together: The 1st strip (with the fold on the left) is OVER the left vertical strip and through the right vertical strip.
Weave the 2nd strip (with the fold on the right) the top piece goes OVER the right vertical strip, then both pieces go through the left vertical strip.
Push the 2 vertical and the 2 horizontal strips together so they are tight and form 1 square, with 4 – ½” squares.
Now take each end of the 4 strips and fold it back on itself then tuck it under the paper towards the center. This makes the "petal" of the flower.
Turn over and repeat.
Now you've made the double-sided “Flower” for the center of your paper bead ornament.
ATTACH the beads, one on top of the flower, and one below, with a long needle. Thread it up through the tip of the bottom diamond bead, up through the center of this flower, and up through the bead that is on top. Make a loop for a hanger. You may wish to add jewelry beads and baubles to embellish your ornament.
This is a card made by using two of the flower centers. Lay two next to each, attach, then machine emboss for texture.
Use two of these to make the design of a cardAnd that's all there is to it - make two paper beads, making sure your sections are exactly 7/8" long and the strip is 7/8" wide. Practice folding on a numbered piece. Make two. Fold the flower by weaving the paper strips together. Then attach the bottom bead to the flower and the top bead.


I-love the way you made the ornament into a card too! So pretty.
ReplyDeleteWhat a fun project Susan, love it x
ReplyDeleteAbsolutely love the uniqueness of the ornament!
ReplyDeleteWhat a great idea Susan, I love it x
ReplyDelete