Showing posts with label Cheerful Daisies. Show all posts

Saturday, September 21, 2024

COLOR COMBO


Today's challenge for our Blog Hop - Stamping with Friends - 
Inspiration from Around the World is a:


Did you ever wonder what the world would look like if our leaves were not just yellow or green or fall reds and oranges?  How about pink leaves or blue leaves or pink & blue leaves. Sometimes my artful creations in paper crafting are realistic, but today my card is bringing all these colors together!

I'm the Card Connoisseurs Susan Boback.  I love ink and adding color.  This is a fairly easy project and while its not new, it has been quite popular in 2024. 
You are inking the background which is EMbossed - raised above - the leaves design. 
I used the Stampin' Write makers to color the leaves by hand in four of these colors.


If you're new to the markers of Stampin' Up!, the Stampin' Write are water-based and can also be spritzed with water, used for watercolor techniques, and will wash off tools and skin and most clothing if washed in cold water right away.  The Stampin' Blends are alcohol based and more permanent. If you want to spritz them, it'll have to be with rubbing alcohol, and they do not wash off of clothing, or skin or tools unless you use an alcohol wipe or other cleaner. 


As shown above, color the leaves in any of these colors:  Shy Shamrock green, Flirty Flamingo pink, Fresh Freesia lavendar, Blueberry Bushel blue, and then I added Crushed Curry yellow.  Since I don't use these colors together, I found this quite a challenge. But when I saw this as art -   and it didn't have to be realistic - it became fun to meet this challenge!

Choose an Embossing Folder with a deep imprint AND a lot of background space - I used Changing Leaves Hybrid Embossing Folder   (Please note that if a product says "Currently unavailable" on our Stampin' Up! website, it is back ordered - check back again) 
Emboss on White cardstock - Basic White
Turn over the cardstock so you are using the DEbossed side: that's where the leaf images are lower than the background.

Add any non-traditional color to the images, staying in the lines. Do this quickly - this is not a color by number picture that should be exactly perfect but more abstract art.  

Open a full-size ink pad - which I found works the best, as opposed to the small "spot" square pads -  and hold it in your hand face down. I used Shade Spruce green.
Press lightly at first and drag the ink pad across the print, applying slightly more pressure to the background areas. 
Try not to stop in the middle of the print - you don't want to get the lines from the end of the ink pad. 

Turn the print sideways and drag the ink pad across the print again.
Now you've added ink to the background which makes the leaves colors pop out.


Trim your print and mount it on a bright background. I used Blueberry Bushel, one of the five colors and also one of my favorite blues.   


Add a sentiment like "Wishing you the brightest birthday" from Cheerful Daisies stamps, or leave without and use for just about any occasion.   Make a double bow of silver trim to attach under the tag.

To discover more about these colors and products, shop our Fall Mini Catalog, link at the top of the page. You can join my team and get a 20% discount each time you order, visit here www.cardconnoisseursb.stampinup.net  Thanks for stopping by! sb

Now hop over to the next blog and see more creativity using these five colors! 


Monday, May 15, 2023

Daisy Pop - Up Card

Welcome to my blog - paper crafting for beginners and long time crafters.  I'm Susan Boback, the Card Connoisseur!


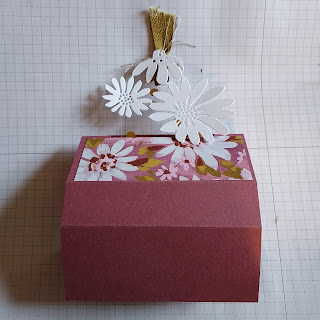
Here's today's project - a Pop Up card. Wouldn't it be fun to receive this and display on your shelf?  

Below is the photo of the first card I made at a workshop about 10+ years ago.  The pop up is made out of cardstock, and the base is embossed. Today's card design is made with a window sheet and the base has layered papers.

Today's design was inspired by blogger Kelly Griglione, who cited Split Coast Stampers. Her first design had a child's photo attached to the Pop-Up, made with Christmas papers and embellishments. The one hat inspired me had a window sheet with a flower on top for her Pop Up.  

My version uses the Cheerful Daisies, Designer Series Paper (DSP), 2023 - 24 Annual Catalog, along with coordinating Moody Mauve cardstock and the Gold Celebrations window sheets.  

This card design, like all on my blog, is meant to be made with any colors or designs that you choose.

Supplies:

1 - 4 1/4" x 11 piece of cardstock, not paper, for the base

1 - 5 1/2" x 2 1/4" piece of window sheet for the Pop Up. 

Scoring tool & Bone Folder

Designer Papers for layering 

Die cuts, punch art 

Ribbon for the pull tab

Tear & Tape or strong glue

Envelope size: 5x7

Follow these instructions, and I think you'll make more than one.

Start with a piece of cardstock, measuring 4 1/4" x 11".  Decide if you want to dry emboss the whole piece for texture or add layers of Designer Series Paper (DSP) for theme. 

Decide how you will embellish or complete the top 1 1/2" of the Pop Up, first, so that the window sheet slides out easily, and then in for mailing.  Also the weight of the cardstock, Stampin' Up! Basic White, die cut daisies was perfect for the window sheet, but any more weight would have made the Pop Up waver.  Note that your die cuts can extend the complete width of the base: 4 1/4".

If embossing, do so first, checking for direction of the pattern. 

Score at

1", 2 3/4", 3 3/4", 7 1/4", 8 1/4", and 10".  

Use a bone folder to crease each score line and fold - this is necessary to make the base stand upright.

Fold each score line, starting with the ends, towards the center. It should end up looking like a squared, capital "B".  Then fold it out flat.

Make the Slot:

Find the center of the 11 inch side - at 5 1/2" and make a tick mark (either on what will be the inside or that can be erased on the out side) on top and bottom. Measure towards the center, 3/4" inch from top and bottom. Mark these spots. You are going to cut a slit from one end of the 3/4" mark to the other. Score this section. Now to make the slot, you'll need to cut on the score line, from the 3/4" mark to the other 3/4" mark.  Move your cardstock over (either to the left or the right, it doesn't matter) 1/16" or so and cut the same length as shown below. Then take your scissors and snip this piece out - this is the slot. See the photo.

Add layers:

If you're adding Designer Series Paper (DSP), attach to the two middle sections, one on each side of the slot.  Cut two that measure 1 3/4" x 4 inches. The width may need to be trimmed down to 1 5/8" inches due to the size of your slot. Attach.   If you make layers for the other sections, there's only 2 others that are visible once the base is done.   That would be the 1" section of the front and back the box.  These layers are 3/4" x 4". They are the next scored segment from the center slot.  (Don't make the mistake as I did of putting layers on each scored section across the page, because half of them fold under to make the base and aren't seen.)

Make the Pop Up Piece:

The Pop Up piece is a 2 1/4" x 5" piece that slides through the slot and is fastened underneath.  Attaching it may seem tricky,  but don't let it frustrate you.  


Looking at the photo of the completed card, 


you see the tall piece that stands up from the base.  This piece, whether you make it out of window sheet or cardstock, attaches underneath the slot between two sections of the cardstock you've scored and folded. 


I've tried to show this here.  The only adhesive you'll use is to sandwich 1" of one end of the window sheet between the two 1" sections, under the slot.  See the photo above that shows the Tear & Tape.

Take the 2 1/4" x 5 1/2" piece of window sheet (this is your pop-up) and slide it through the slot. Center it in the middle between the two 1" pieces, folded up under the base. Use Tear & Tape to secure it here.

Remember that we said that when its rolled together, it looks like a capital B, from the side.  

Embellish the top of the Pop Up:

Once you have the Pop Up piece attached, move it in and out, collapsing the base and opening it to the standing position a few times.  You will see that about 1 1/2" of the top remains when its collapsed.  This is the space where you can add die cuts.   If you use cardstock instead of a window sheet, you can stamp on the whole pop-up piece because there won't be any die cuts that get stuck when it is collapsed.  


The above photo shows the 1 1/2" that sticks out once the card base is collapsed.

I hope you make this pop up card - wouldn't it be fun to receive?! Contact me at sboback54@gmail.com or by following me on Face Book at Card Connoisseur.   I'd love to see your cards and projects.   

I'm an Independent Stampin' Up! Demonstrator - the Card Connoisseur!  I've been crafting nearly my whole life (I'm a great-gram) and find that card making is a three-fold process:  the creation - sometimes an idea will swirl around in my mind for days or longer. Then putting together the ink or paper or stamp in the design mode to make a card. Second, is the thinking of the person you're sending it to as you seal the envelope and put on the stamp to send it on its way.  Third, you hope the person experiences joy or care when they open your card, and the bonus is when you get their response.  

I'd love to tell you more about the beautifully coordinated products of Stampin' Up!  Whether you're a beginner or have been creating for awhile, my projects posted in this blog and online, are meant to inspire and share this hobby of paper crafting.  If getting a discount on quality products, special shopping times, and earning points for free products interests you, I'd love the chance to tell you more!  Click on the link on this page and contact me - there's absolutely no obligation.

Thanks for stopping by.  Be blessed! sb