Celebration Day - Hey there crafty friends! I'm so glad you stopped by for Blogger's Choice. Today is my 70th birthday! There! I said it out loud! My dad used to say "its just a number", so Dad?! I might be coming around to that way of thinking. I certainly have "a number" of reasons to be thankful. One is being crafty and sharing my ideas with you!

For today's challenge I chose a fun card design - like celebrating a momentous birthday! This card is called a Squash Explosion card. I was inspired by a crafter on Instagram, Katharina Tarta Crafts.

(Tap on the pink links to find the products I recommend)
Supplies needed:
Card Base Cardstock is 8 1/2 " x 5 1/2"
Squash Explosion inner layer, Designer Series Paper or double sided paper is 8" x 4"
Front layer is coordinating Designer Series Paper 1 3/4" x 5 1/4" - cut two (I embossed my card base instead of adding front layers)
Belly Band is 8 1/2" x 1" (or longer if you want it to overlap)
Belly Band layer 3" x 3" or make it your own with a die cut or punched piece
Tear & Tape, Multi Purpose Glue
Directions:
Card Base is a Gate Fold. Score your 8 1/2 x 5 1/2" 2 1/8" on both ends. Fold and burnish folds.

Squash Explosion piece - the print you want to see when you open the card is the side that should be face up. I found it helpful to make a pattern of the score lines to refer to for future cards.
Make a tick mark on the top and bottom of the long sides, for the center point. This is helpful so you can score the angles.

Fold and burnish each fold, then pinch the angles together.
To fold this squash explosion piece, turn the paper so the long sides are on the left and right. With your pointer fingers behind, pull the sides at the 2" line forward, then push/pull it down towards the center. Turn the bottom section up and do the same on that end.


This photo shows how it should look after folding in each end.
Now you have the two main pieces of the card: the base and the Squash Fold layer
A Belly Band keeps the card together till opened. Fold it around the card. Use your top Belly Band layer to join the ends of the belly band, which creates a focus point for the front. Add a sentiment here or leave it for the inside. I embossed for texture and added gold embossing powder. Don't you love how this looks?


I also added an embossed layer inside under the squash explosion piece, and used gold embossing powder. (I might have went a bit overboard with the dry embossed pieces, but I just love how this looks!)

Products used
Cardstock - Lost Lagoon or Pool Party
Designer Series Paper (2024 Annual Catalog) Country Woods
Layered Florals Embossing Folder
Ephemera for sentiments outside and inside
Embossing Pen - Recollections Brand found on Amazon

Ink - Summer Splash (2024-26 In-Color)
Tear & Tape, Tombo Multi Purpose Glue
Markers - Stampin' Write (water based) markers.
Stamp a sentiment on the diamond shape center layer before you glue it down.
Add color to your stamped image. I like to use a "pointellism" design which is where you tap with dots the spaces you want to fill in with color. This technique is perfect for small areas. Colors used are Shy Shamrock and Peach Pie, 2024 In-Colors.

To add embossing powder to small areas, I recommend an Embossing pen. This is a perfect way to add a small amount of embossing powder with the tip of a pen.
Next add Tear & Tape to the back of the diamond shape center, and attach it to the center of the inside.
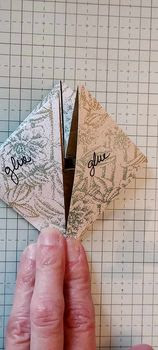
Then add glue to the top Squash Explosion pieces as shown in the picture, folding the gate fold over the glued sections and press down firmly for a few seconds. This will attach the squash layer to the inside of the gate folds.
Open and close a couple of times. Add the Belly Band and any remaining sentiments, which is so easy to do with the new Ephemera, 2024 Catalog.

This design may need a 5x7 envelope due to its thickness.
Why not make a Squash Explosion card and surprise someone! One of the greatest joys I have is bringing cheer and fun thoughts to another - make a card - cheer up the world one card at a time! Want to know how you can save 20%? Learn more here https://www.stampinup.com/community/join-stampin-up
Thanks for stopping by! Be Blessed! sb Click on the links below and discover more creativity on this JUNE 1st Day!

Such a fun card Susan, love it x
ReplyDeleteOMG...I'll have to try this one...
ReplyDeleteHappy Happy Birthday my friend.
ReplyDeleteBeautiful card. Thank you for hopping with us
WOW! What a fancy card!
ReplyDelete