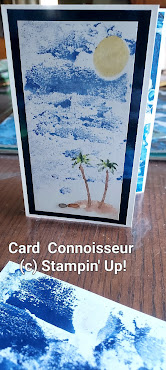
Today’s project I’m calling “Mask before the Mask (before the Mask)” You may know how to cut an adhesive backed paper in order to mask under the ink.
Today's MASK Technique shows how to add ink beyond that masked space.
MASK #1 SUN or MOON
We're making a sky & water scene, so decide first if you want a sun or moon. Cut it out of a Sticky Note or Adhesive Sheet, and
place it on the paper where the sun or moon should be.
Here are three prints that I made with todays masking techniques. The top two are sun and sky and the bottom print is my attempt at nighttime sky (even with the bright green grass).
The print below is one I nearly gave up on. But when it dried, I was so pleased with what could be water or clouds, and that the yellow did not bleed into the blue, which was before I added the barrier.
MASK #2 CLOUDS, WATER
Use a white, colored pencil, not a water color pencil. Where ever you want your clouds or waves to appear, color with the pencil or a white crayon. This creates a mask or resist, once ink is added around it.
You can also create a barrier with the white pencil or crayon if you are planning to add yellow in the blue sky area, and don’t want it to blend and turn into green.
MASK #3 SKY, WATER, SUNSHINE - the main focus of today's project
Use a well inked full size ink cartridge (not shown) OR
Squirt a dot or two of liquid ink OR
Scribble with the Stampin' Write maker on a silicone craft sheet or a clear stamping block (as shown below) Make sure you're not using the Blends alcohol markers. They dry too fast to transfer the ink.
This is the Starry Sky (2022-2023) In-Color.
Each time you transfer the ink, the imprint is a little different. Start at the top, remembering to use a small amount of ink, because you can always add more layers later, and work quickly down the page.
Since I knew I wanted to create cloud and sky and water with a tropical view, I planned to add sun and use 2/3 of the paper with blues for sky and water. Sometimes, though, you don't create the scene till the ink dries. Think of the colors of blue skies with clouds and sun. You’ll probably agree that no two skies are alike. And no two prints you make will be identical.
TIP: If you're frugal like me, you'll discover that once the masking tape, sticky side is dry, it can be used over and over with the same color.
If you know what you'd like to do, for background, remember to decide first:
Day or night = sun or moon (MASK #1 adhesive circle to cover
the space)
Clouds (MASK #2 – white crayon or color pencil in white that is NOT a water color pencil to create a mask)
Blue sky of day or night or water (MASK #3 with masking
tape)
OR make an abstract background by placing the masking tape on different angles, leaving white spaces or no spaces. You are the artist!
To complete today's Masking project, I added palm trees, embellishments of stepping stones, Wink of Stella for the moon or Daffodil yellow to the sun.
OPTIONAL: for night sky, add star flecks. Use a White Craft Ink refill. Put a dab of it on the end of a Water Painter, and while holding it over your print, bounce the brush on your extended finger which should "flick" the paint onto the print. (Not a great explanation, but hopefully you'll either have done this before, or can figure out how to flick the paint drops onto your print)
Trim your print for the front of a card, or display in a
frame on your desk. I used an A2 card base of Basic white. Score an 8 1/2" x 5 1/2" piece at 4 1/4" then cut 1" off the front of the card. I used the retired Waves of the Ocean Designer paper, cut at 3/4" x 5 1/4" to emphasize this 1" section of the inside that shows. Use a metallic layer or Starry Sky cardstock cut at 3 1/4" x 5", and layer your print on top which should measure 3" x 4 3/4".
If you're new to these measurements, think about subtracting 1/4" for each layer from the base. Knowing that an A2 card (USA and Canada) is 5 1/2" x 4 1/4" was one of the most valuable bits of information in card making I learned. With that in your mind, you can always cut layers at 1/8 or 1/4" smaller to showcase colors, prints and embossed pieces.
These are the products I’ve used for the prints shown.
Paradise Palms #157716 page 23 Annual Catalog (2022-2023)
Starry Night Ink, re-inker and cardstock page 122 Annual Catalog
Daffodil Delight Ink, page 122 Annual Catalog
White Craft Ink #101780 page 129
Masking tape. White Colored Pencil that is NOT water color pencils, or White crayon.
I hope you enjoyed this. Sometimes, I just have to get all ink-y!
Post your version of this project on Card
Connoisseur on Face Book or send me an email.
I’d love to see how you Mask before the Mask before the Mask.
Make sure to visit my online store for these products, check out my project page and learn why I love Stampin’ Up! products so much!. www.susanboback.stampinup.net You can be part of my Team and enjoy the creativity, community and discounts too.
Thanks for stopping by! Be Blessed. sb


No comments:
Post a Comment